Client Photo Selection Before Retouching: A Two-Stage Workflow That Prevents Wasted Editing
Build a client photo selection workflow before retouching: prepare proofs, set limits, lock selections and move only approved files into detailed editing.

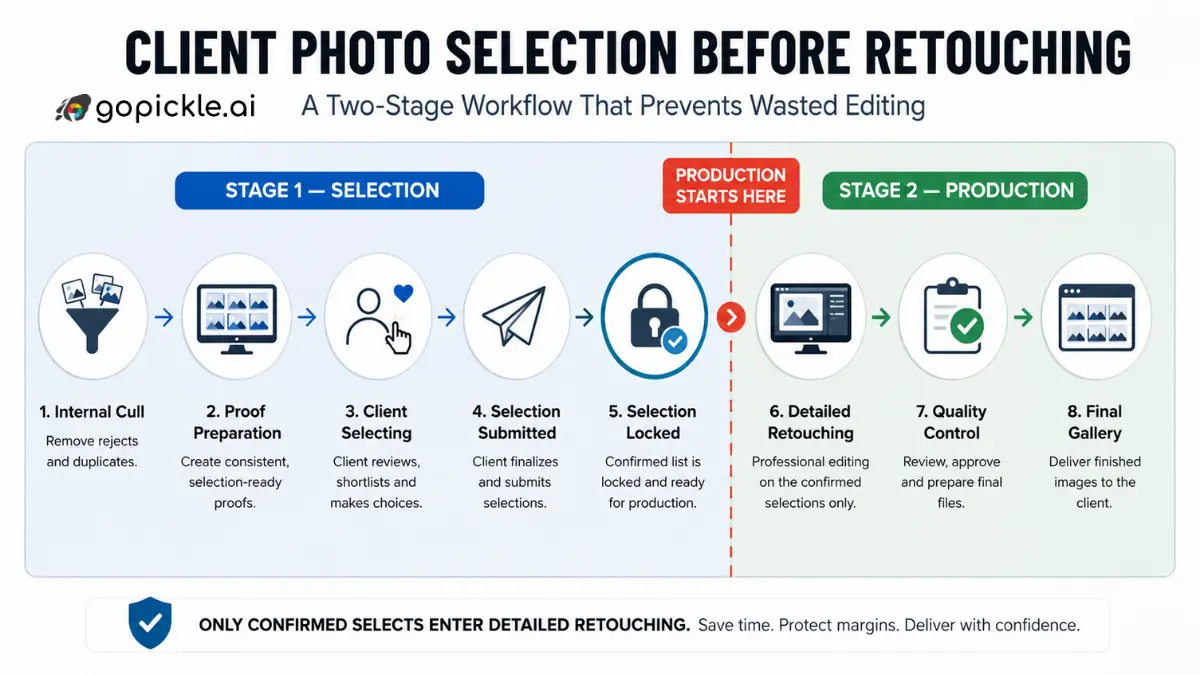
Detailed retouching is an expensive place to spend post-production time on an image that may never be delivered. Yet many studios blur two different decisions: which photographs does the client want, and how should those photographs be finished? A client photo selection before retouching workflow separates them. The studio prepares a controlled proof set, the client makes one confirmed selection, and only that locked set enters detailed retouching.
This works especially well for portraits, headshots, commercial work and any package where the client receives a fixed number of finished images from a larger shoot. The proof gallery has one production job: establish which files are authorised to move forward.
| Stage | Owner | Required output |
|---|---|---|
| Internal cull | Photographer/studio | Curated proof set |
| Proof preparation | Photographer/studio | Consistent review previews |
| Client selection | Client/authorised reviewer | One completed selection |
| Selection lock | Studio | Confirmed retouching list |
| Retouching | Photographer/retoucher | Finished selected images |
| Final delivery | Studio | Approved delivery files |
When selection-before-retouching makes sense
Selection-before-retouching is most valuable when finishing each image requires meaningful manual work and the client does not need every viable frame. A portrait package might include 12 finished photographs from 60 proofs; a commercial shoot might produce 150 viable frames but require only 10 campaign selects for detailed finishing. Retouching everything first turns client choice into an expensive guessing exercise.
It is not the correct workflow for every job. A documentary wedding package may promise a complete photographer-curated edited gallery, so the client should not be choosing which images receive the studio’s normal colour and tonal treatment. In that case, client image selection may happen later for an album, print or wall-art order. The useful boundary is therefore not simply “edited versus unedited.” It is selection-ready versus production-ready: basic correction can happen before selection; expensive image-specific finishing usually waits for the confirmed set.
Prepare proofs without over-editing
Start with an internal cull, not a camera-card dump. Remove technical failures, accidental frames, test shots and redundant near-duplicates that do not create a meaningful choice. Clients should be choosing between photographs you are willing to finish and deliver, not filtering out work the photographer already knows is unusable. For the broader client-facing process, see our guide to making photo selection easier after an event. How to Make Photo Selection Easier for Clients After an Event
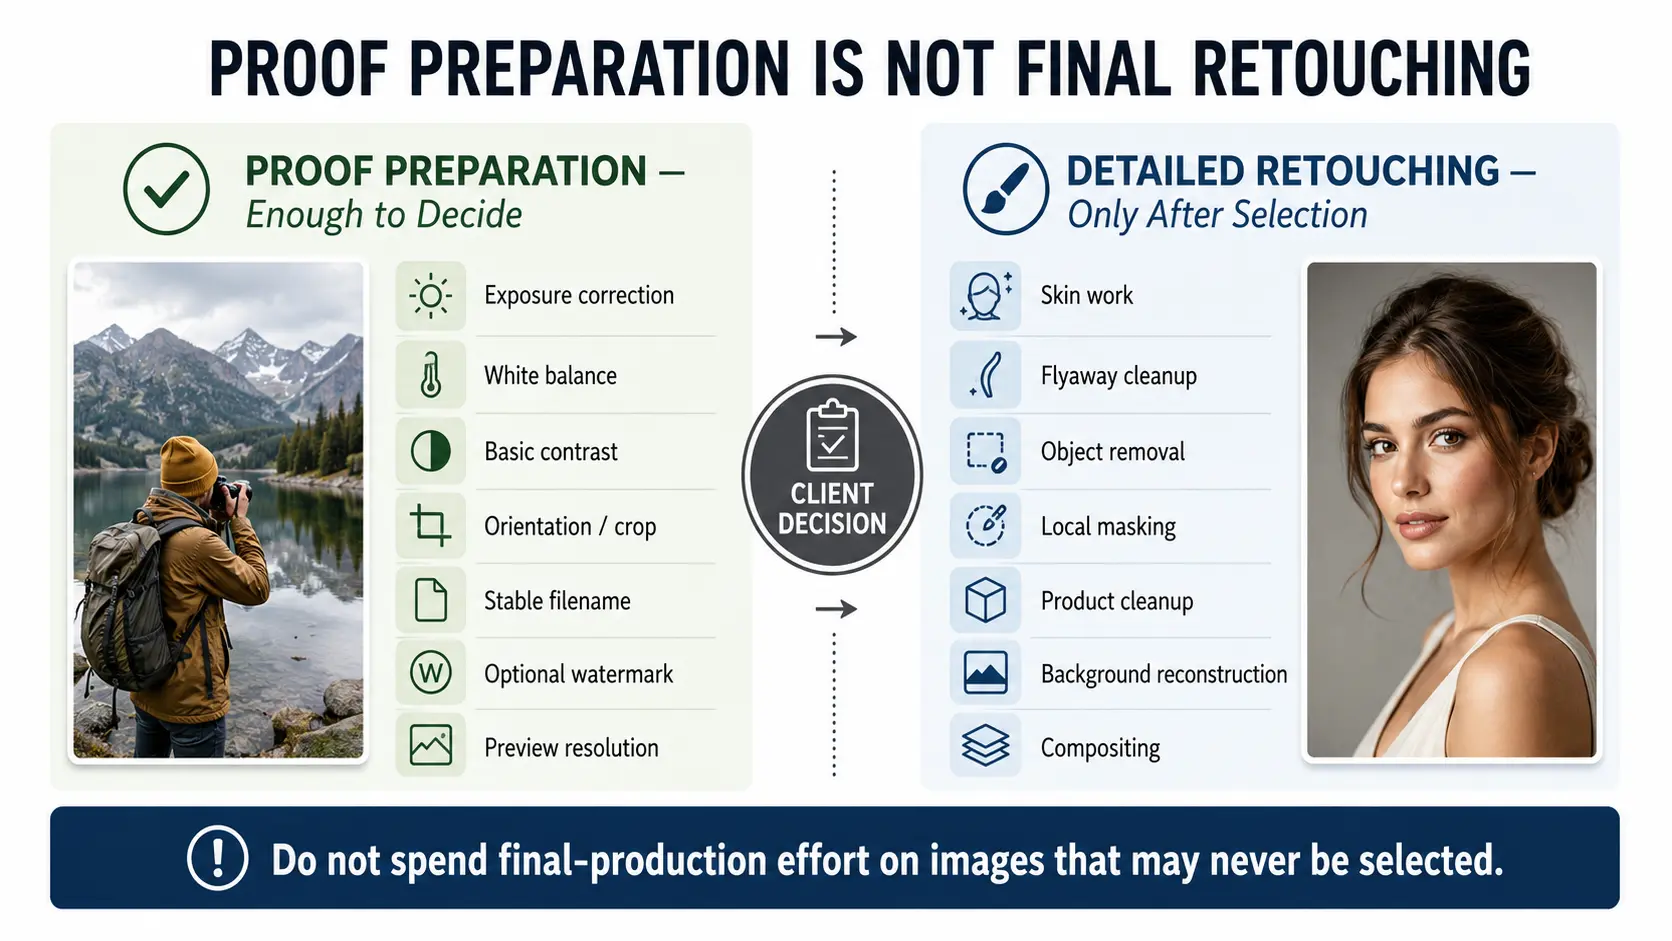
Then apply enough correction for the client to judge each frame fairly. Exposure, white balance, basic contrast, orientation and a representative crop may need attention. Detailed skin retouching, flyaway cleanup, object removal, extensive dodging and burning, product dust cleanup, advanced local masking, background reconstruction, head swaps and composites normally do not. Those are production tasks, and doing them across the proof set defeats the reason for asking clients to choose photos before editing.
The proof also needs a stable identity. Keep filenames or another unique reference consistent from proof export through selection and into Lightroom, Capture One, Photoshop or an outsourced retouching queue. An online proofing gallery still creates manual work if the studio later has to guess which source file corresponds to “the third photo in the second row.” For unfinished work, preview-resolution files, watermarks and restricted downloads can be appropriate; proofing access does not have to equal final-delivery access.
Set selection limits and rules
“Choose your favourites” is not a production instruction. If the package includes a fixed number of retouched photographs, state that number before the photo proofing workflow begins: “Please choose up to 15 images for final retouching.” If additional photographs can be purchased, explain the extra-image price or approval process at the same time. A selection limit prevents the studio from receiving 38 favourites and then having to work out which 15 were actually meant for production.
Define what the selection control means as well. A heart can mean “I like this,” “show this to my partner,” “put this in the album,” or “retouch this image.” Do not let one action carry several meanings unless your photo selection software clearly separates them. GoPickle’s client-selection workflow can separate purposes such as album, editing, frame and favourites, which is useful when one gallery is feeding different downstream jobs.
For multi-person reviews, decide who can shortlist and who can approve. A couple may both participate, while a commercial job may involve an agency producer, designer and marketing manager but only one authorised contact for final selects. The studio needs one production decision, not several overlapping lists.
Collect one confirmed submission
A selection that is still changing should not quietly become a retouching queue. This is where otherwise good photography client selection workflows fail: favourites appear in real time, the photographer sees enough images selected and starts editing, and the client changes three of them the next morning. Production simply started before the decision was complete.
Use a clear completion action. Browsing, shortlisting and commenting should remain reversible until the client submits or explicitly confirms the selection. After that, the studio needs one definitive set containing the selected image references and any image-specific notes. If your client proofing software does not provide a formal submit state, create one operationally by asking the authorised reviewer to confirm that the current list is final before work starts.
Keep which image separate from what should happen to it. “IMG_1842 selected” identifies the production item. “Reduce shine on forehead” or “remove the stand on the left” is a retouching instruction attached to it. Scattered messages that mix file identity with creative directions are difficult to hand safely to another editor.
Lock the selection before production
Submission is the client action; locking is the studio action. Before detailed retouching begins, check that the count matches the package, every image maps back to the source files, near-duplicate choices are intentional and unusual retouching notes are understood. Resolve ambiguity now, before expensive work is committed.
Then turn the submitted list into a fixed production set and give it a clear status such as Selection Confirmed or Ready for Retouching. At GoPickle, we think of this as a handoff state rather than a heart count. If the work is outsourced, send the retoucher the locked source files and instructions rather than the entire shoot. Preserve the selection record with the job so later questions can be answered from a known version.
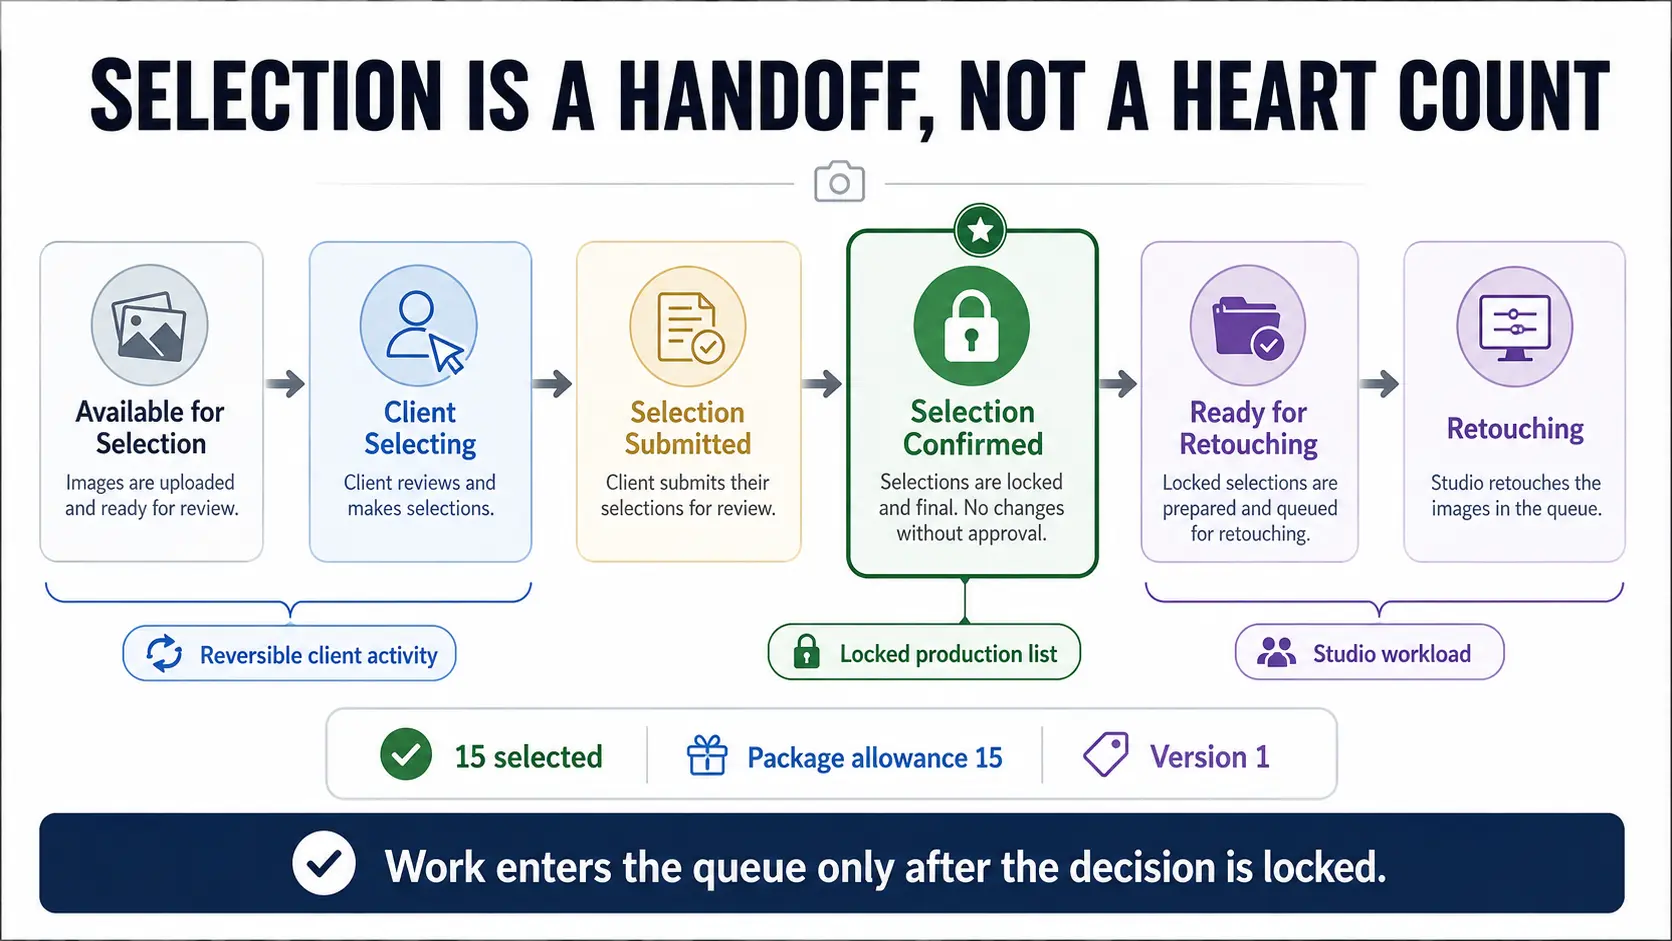
This also improves capacity planning. Twenty favourites are not necessarily 20 images of confirmed workload; 20 locked selects are. Editors can be scheduled more accurately when only confirmed work enters production.
Handle late changes and extra selections
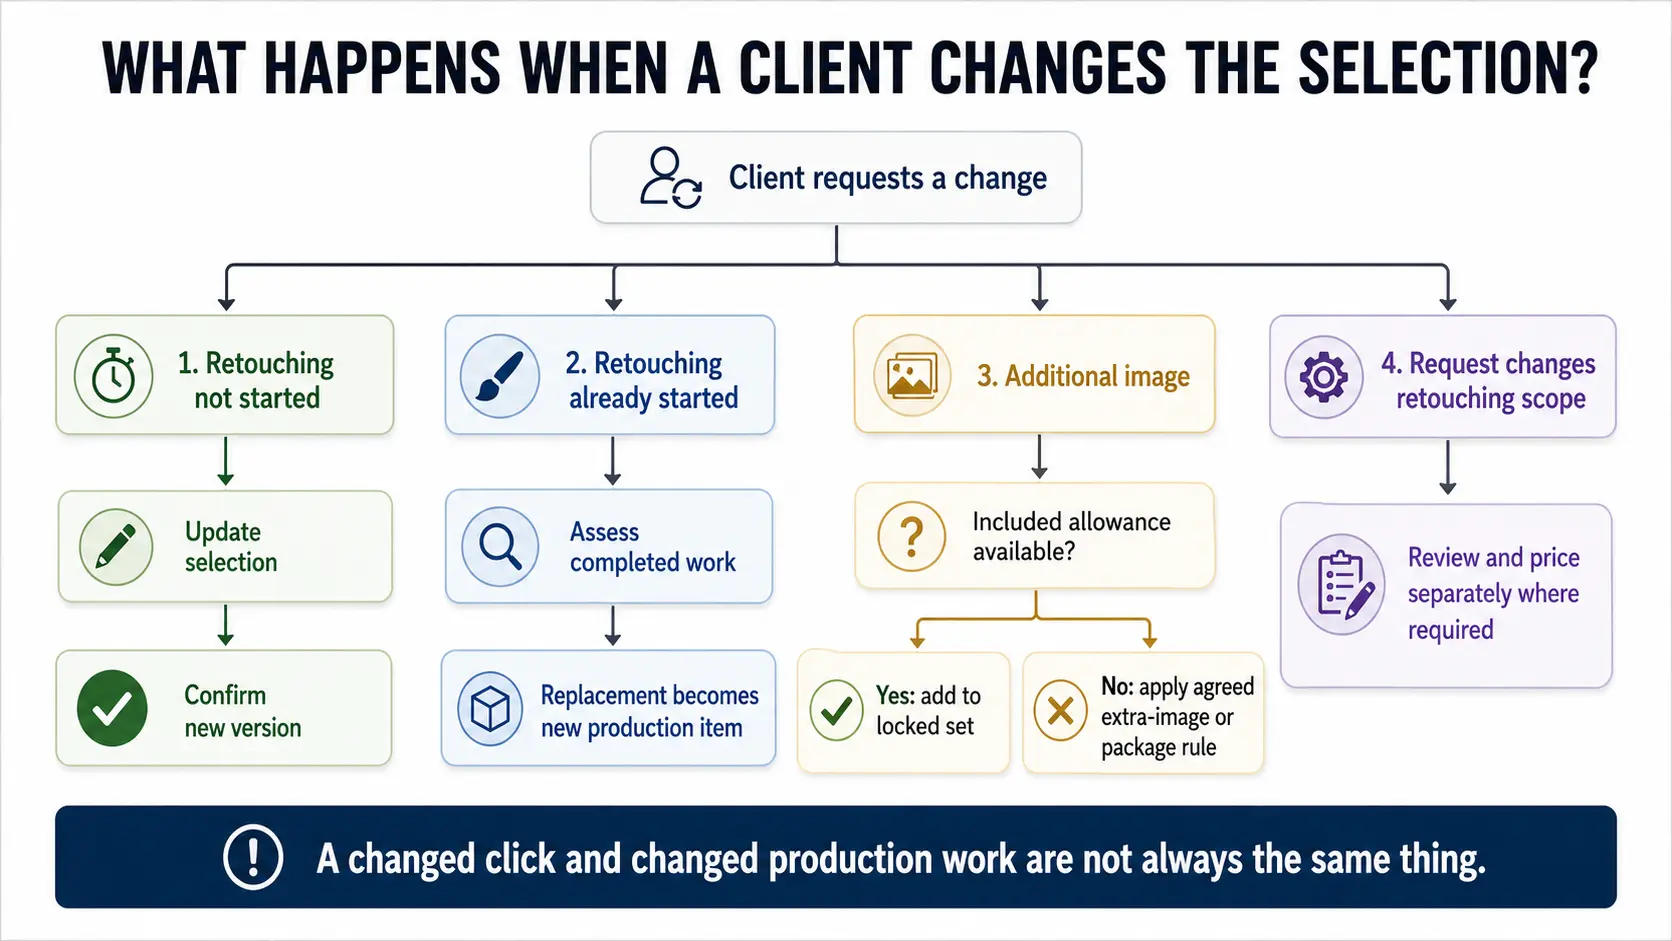
Clients change their minds. The relevant question is whether production has started. If a client notices before retouching that they picked the wrong expression, replacing one proof with another may cost almost nothing. If the original has already been retouched and prepared for review, the replacement creates another production item.
Set the rule before proofing. Extra selections can be billed at the agreed per-image rate or handled through a package upgrade. Swaps after retouching begins can use another retouching credit or attract a fee when meaningful work has already been completed. Complex requests such as head swaps, major object removal, background replacement or composites may also sit outside standard retouching scope even when the selected image itself is included.
When a locked set changes, version it. “Selection v2: replace 1842 with 1851” is safer than silently deleting the old choice. The current version should always be obvious to the photographer, retoucher and client.
Move final files into delivery
Once the locked set is retouched, complete quality control and prepare the agreed exports: print files, web versions, commercial crops, colour space, naming or other deliverables. The final gallery should now behave like a delivery environment rather than a proofing environment. Watermarking or restricted downloads that made sense during selection may need to be replaced with the access and files the client has purchased.
GoPickle Client Galleries can support this handoff with private access, watermark previews, favourites and shortlisting, organised collections, mobile-friendly viewing and photographer-controlled downloads. GoPickle Client Galleries The same gallery platform can support both review and delivery, but the studio should still keep the stages distinct: proofs are for deciding; finals are for receiving.
If the next production task is wedding-album design, keep that as a separate selection purpose rather than reopening the retouching decision. Our guide to faster wedding album selection and approvals covers that downstream workflow in more detail. Wedding Album Selection: How to Get Faster Client Approvals
A controlled photo selection workflow is not extra administration between the shoot and Photoshop. It prevents expensive work from starting on an ambiguous client decision. Cull first, prepare honest proofs, define what the client is choosing, collect one final submission, lock it, and only then let those files consume retouching time. That boundary protects margin, keeps editors working from the correct list and gives clients a clearer understanding of when a preference becomes a production instruction.